Showing posts with label Woodcut. Show all posts

Saturday, December 24, 2016

Protest Posters--UPDATED

Protest Crude Disasters, Linocut
© Elana Goren
UPDATE: This is what the final linocut looks like. I omitted the oil pipeline from Orange Julius' head since I thought it was too weird and distracting. The linocut is on display at Trumpocolypse: What Now? at the Sacred Gallery in NYC and there is a high-res, downloadable, digital version at elanagoren.com. Thanks to Blond Jenny who posted some shots of the opening on the Sacred Gallery facebook page: https://www.facebook.com/pages/Sacred-Gallery/126499077405905
_______________________________________________________

This is the initial plan for a 18" x 24" woodcut poster that I may be carrying at the Women's March on January 21, 2017. I'm also working on a more woman-oriented one that might be more appropriate. I can save this one for a more general and/or environmental protest. I'll be working on this for the next couple of weeks. This will be one side of the poster.

The other side will be this:
Silkscreened on foam core. Two very different styles, I know, but without access to silkscreen facilities for the next few weeks, I opted to do a woodcut which I can print in my studio.

Tuesday, October 7, 2014

Big Steamroller Printing Day on Sunday

This past Sunday, October 5, was the day that the steamroller project came to its ultimate conclusion—the printing of the huge woodcut blocks with a steamroller.  It was a beautiful day in Garrison, NY and we had a great turnout. There are some really wonderful (and nicer than seen here) photos of the event on the Garrison Art Center Facebook page and a really nice photo essay on this blog (link).

My plates went first and there were logistics that had to be worked out after mine and another set of plates were printed unevenly. After that, they rotated the direction of plates in relation to the steamroller drum which yielded better results. So, they very generously offered to print my plates again at the end of the session so that my 2nd print would benefit from the kinks having been worked out after the first printings.

Below is a step-by-step photo sequence that explains how the printing was done:
Here are some of the blocks waiting to be printed.

Inking up the plates with a huge roller.
Cutting the vinyl blanket to size before it's put over the underboard.

These are my 3 inked plates (triptych) side-by-side
on top of the vinyl blanket and the underboard.

Laying the proofing paper over the plates.
The top blanket layer goes over the paper.

The top MDF board covers the layers of
blankets, plate and paper.

Sweeping the dust and dirt from the roller drum.
Driving over the boards to print the plate sandwiched
between top and bottom boards, blankets.
Pulling the proof after printing.
Head Trap, Woodcut, 96" x 48" (8' x 4')
The second print had better ink coverage. Some areas were over-inked but overall it was pretty cool having a print this size.

Wednesday, September 17, 2014

Steamroller Project Work-In-Progress

Initial sketches (in book) and further sketch for the three 32" x 48" panels
I've been working away on the woodcut project for Garrison Art Center's Rolling on the River event. Above you can see the initial sketches that I was working with to create the composition that I am using for reference to carve the images.

I have three 32" x 48" panels which will form a 4' x 8' triptych print. The composition was designed so that each panel could stand alone as well as work in combination with the other panels to form a larger unified image. This was done partially for logistical reasons (fitting the panels in my car as well as easing the ability to hand-print later on—if I wish to—when I won't have a steam roller on hand).

Below, are images of the middle and left panels on the floor with my sketch reference handy to guide me as I carve the image into the wood. The wood that I am using is 1/2" birch plywood.

The bottom pic is of the right panel with ink applied so I could see the image more clearly and add details and refinements with more clarity. I'm still working on this but it gives me an idea of how the other panels will look and where I need to modify my approach as the image comes together.

Sketch reference on top of middle and left panel. Carving in-progress.

Right panel with ink applied so that I can see the image more clearly. Still working on details but the cow image is emerging.

Tuesday, August 12, 2014

Steamroller Printmaking

Though I realize that this blog has been very quiet of late, relying on old posts about watercolor monotypes and other intriguing techniques to satisfy visitors' need for information, I am now trying to get back to a (semi) regular posting schedule.

I have some news about a new woodcut project and I hope to document my experience and post this on the blog in the next month. I have been asked to participate in the Garrison Art Center's Rollin' on the River event where large-scale woodcuts will be printed using a steamroller. While this is certainly not a new thing in the printmaking world, it is something that is new to me as I have never worked on this scale before. I am working on a plywood plate that is about 4 feet x 8 feet which will then be printed on the event day, October 5, via steamroller. This event will help celebrate the Garrison Art Center's 50th anniversary.

Friday, November 25, 2011

The Fine Art of Polemic Politics

"Title Page" Sandow Birk first came to my attention a few years ago when I was introduced to his woodcut series, The Depravities of War, in a book by the same name.

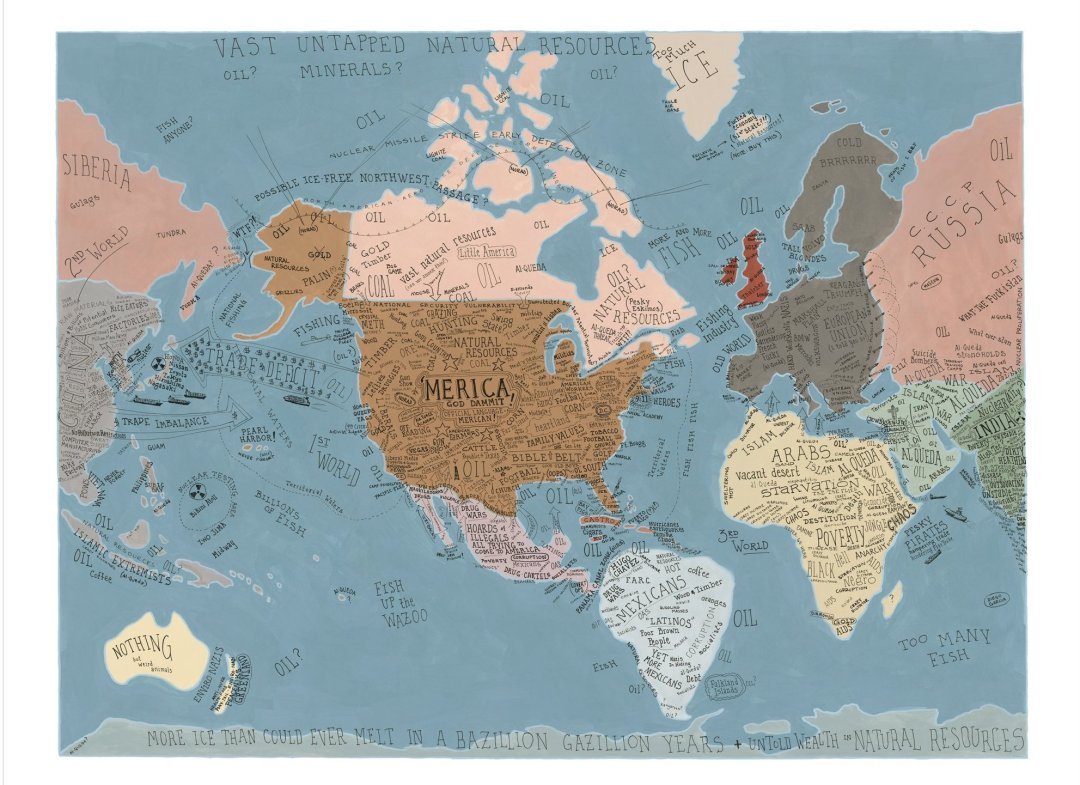
 I just read an article about a new project where he and his wife, artist Elyse Pignolet created two maps of the world, one from an American, politically conservative point-of-view and another from an American, politically liberal point-of-view. I had a few chuckles reading their maps.

Here's a link to the article I saw online at the Huffington Post. And also there's a great post about it over at the New American Paintings blog.


Saturday, June 19, 2010

New Woodcut

"Sundown"
Woodcut
Plate size: 13 1/4" x 12"

I am attempting to expand my printmaking focus and create more woodcut prints. One reason is that I love the way the wood grain comes through on the print. I also find the act of carving the wood very therapeutic, almost meditative. The wood also guides me, helping me with the direction that I take the work and I love aspect of the creative partnership with the medium.

I try to find discarded scrap wood, if possible, so that I can try to minimize my impact on the trees used for plywood, etc. It's not always easy or practical to do this but I think it's worth the effort to find scrap when and where I can.

I find that my approach to carving the wood is similar to my approach to creating aquatint etchings where I tend to use multiple strokes to add depth to the image. With etchings, I use a brush with stopout (both asphaltum-based and acrylic-based) to create the varied layers of tints. And with woodcuts, it seems natural to me to make the same type of marks with my carving tools. I'm not sure if this is the best approach to use for wood since it lends itself to yielding more bold and graphic prints than does etching. Yet, it seems that my style leans more towards the subtle and a focus on detail (unless I'm working on monotypes), so this comes through on my woodcut work as well as with my etchings.

Monday, February 2, 2009

Experimenting with brayers

I'm planning to get more involved with monoprinting and I'm looking forward to seeing what kind of effects I can get just by using a brayer loaded with color. I had started a bit of this while working on some woodcuts (as seen with the gourd print) and I am fascinated with the process of combining monoprint painting on a woodcut plate as well as on the customary plexiglass plate.

My friend and mentor, Bruce Waldman creates amazing monoprints with a variety of textures and techniques but he draws the images with the edge of his brayer. The line is so expressive and there is movement and energy in every one of his monoprints. I have been awed by the mastery, spontaneity and strength of the lines in Bruce's monoprint work and when he told me that it was done with the edge of a brayer, I was amazed and inspired.

The thought of the use of brayers to draw and make marks on a plate has opened up many possibilities for future work in my mind. Not just for working with brayers but for using all kinds of tools to create textures and lines even if that was not what they were originally designed for. It is yet another example of how versatile and flexible printmaking is. The seemingly endless possibilities lead to yet more possiblities. So much to try, so little time.

Monday, October 20, 2008

Milkweed Time


My sister and I headed upstate to the Rhinebeck area to see a friend's open studio as part of an open studio tour happening up there. It was great to see James and his wonderful studio and he helpfully guided us to other notable studios participating. One, in particular, was that of a glassblower who's work was reminiscent of Chihuly and his demonstration of how he works was really fascinating.

I had noticed while driving up to his studio that he had a magnificent stand of milkweed right at the edge of his property.  I took my camera and photographed as much of it as I could since milkweed is one of my favorite subjects.  I love how the seeds burst from the pod using the wind to help them escape and fly away to the wild beyond.

Above the photo is an example of a milkweed woodcut I did last spring.  I plan to experiment with some etching techniques using this subject for a series.